

 Kristina "Kristen" Tomilova
Minecraft is a very popular game that can be played on almost all devices. It's no surprise that it is available on Chromebooks as well. This convenient and easy-to-use device runs on Chrome OS. However, due to the specifics of the system, many users wonder: Minecraft for Chromebook? Is it really possible? The answer is yes!
In this guide, we will thoroughly go over all the installation details and provide some useful tips for improving performance.
General Information About Minecraft on a Chromebook
The following specifications are required for stable game performance:
- System Architecture: 64-bit (x86_64, arm64-v8a);
- Processor: AMD A4-9120C, Intel Celeron N4000, Intel 3865U, Intel i3-7130U, Intel m3-8100Y, Mediatek Kompanio 500 (MT8183), Qualcomm SC7180 or better;
- RAM: 4 GB;
- Storage: at least 1 GB of free space.
These are the minimum requirements for Minecraft on a Chromebook. If the game still stutters on your device, we have a small guide at the end of the article to help you address this. Now, let’s move on to the installation process. First, it's worth noting that you can directly install the Bedrock Edition from the Google Play Store.
This is very simple: open the store, search for the game, and go to its page. However, keep in mind that it costs $20. But if you already have the Android version, which costs $7, you'll only need to pay an additional $13.
This method is convenient for those who don’t want to spend time on installation.
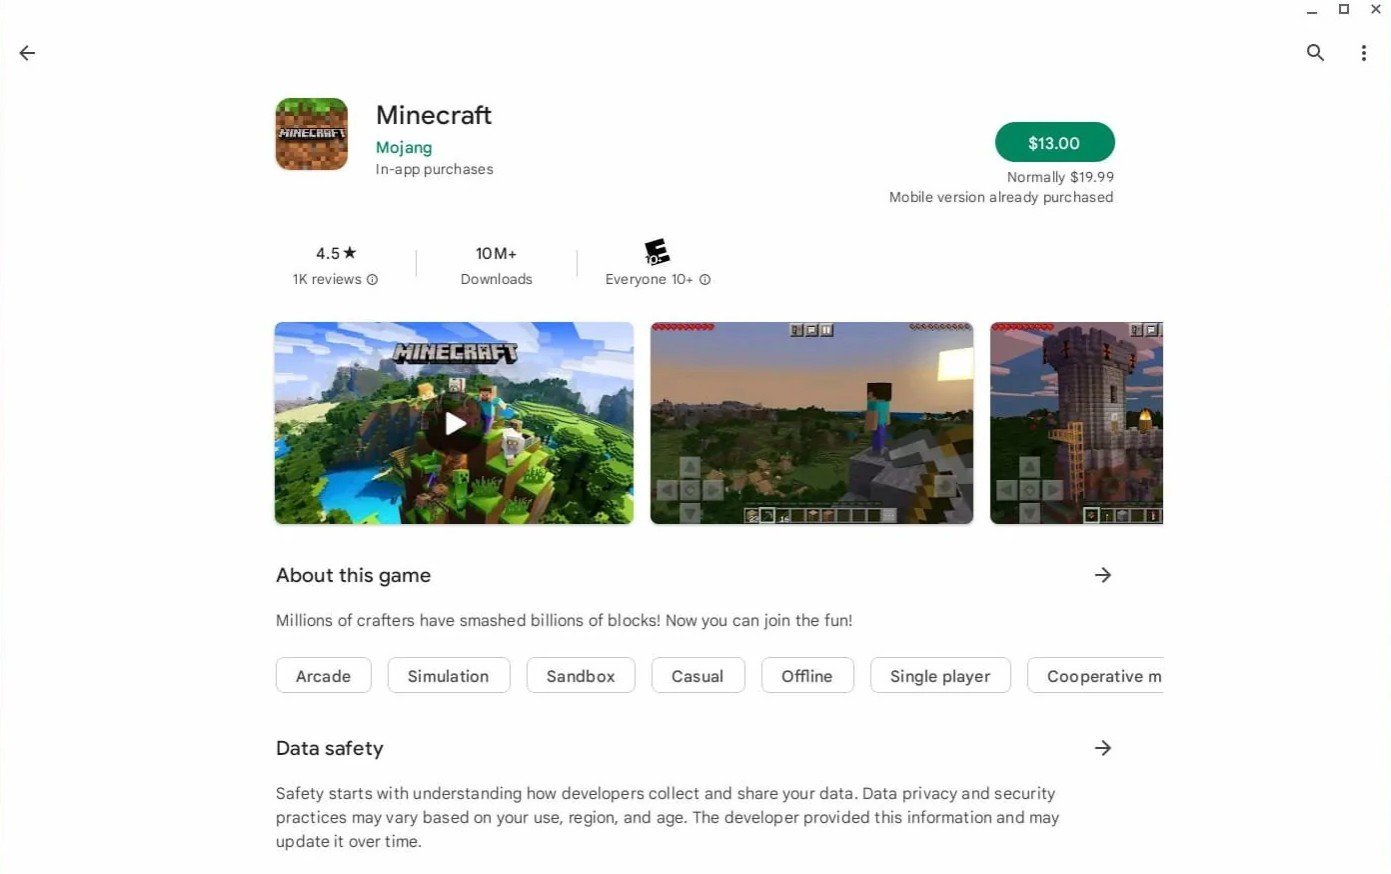 Image: aboutchromebooks.com
However, not everyone likes this version of the game. Fortunately, Chrome OS is based on Linux, and Minecraft has been available for it for a long time. The installation will require attention to detail because the system is very different from the familiar Windows, and some code will need to be written. We’ve prepared a detailed guide for you and will now explain how to play Minecraft on a Chromebook in just half an hour.
Enabling Developer Mode
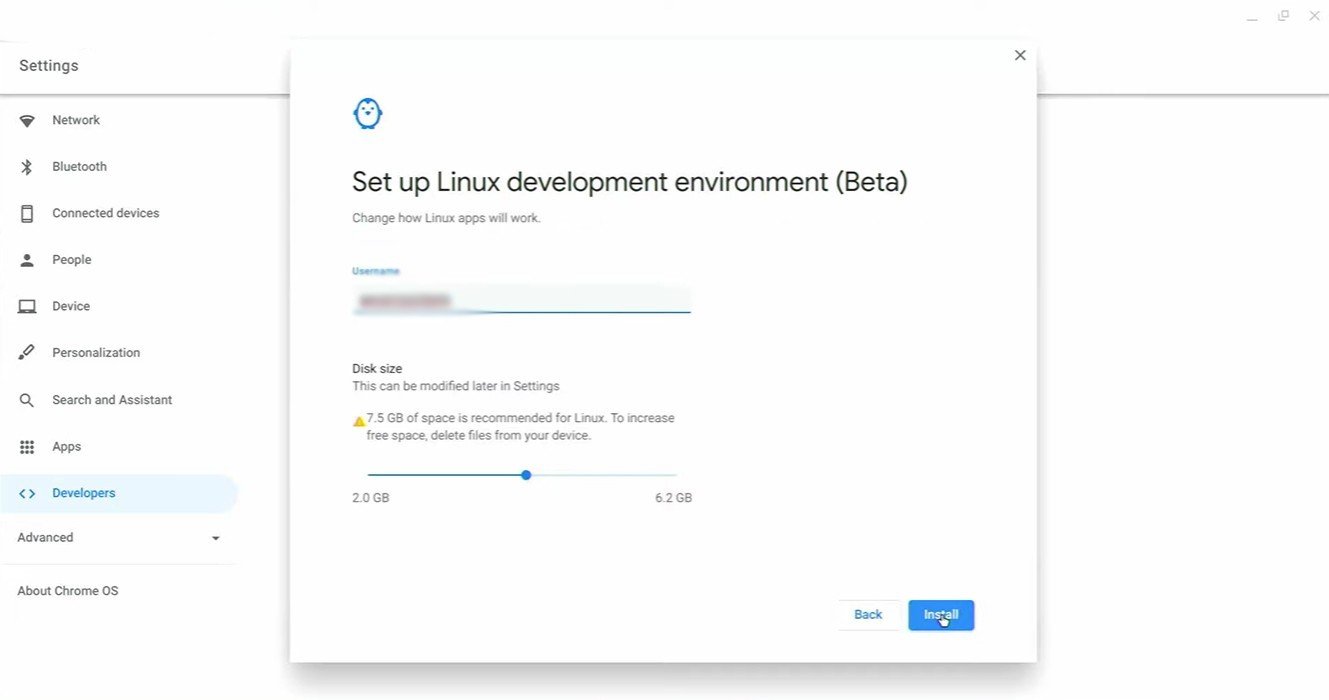 Image: youtube.com
First, you need to let Chrome OS know that you mean business and intend to enable Developer Mode. To do this, go to the settings menu through the equivalent of the "Start" menu and navigate to the "Developers" section. Enable the "Linux development environment" option. Follow the on-screen instructions, and once the process is complete, the Terminal will open — a special program similar to the command prompt in Windows, where further work will be done.
Installing Minecraft on Chromebook
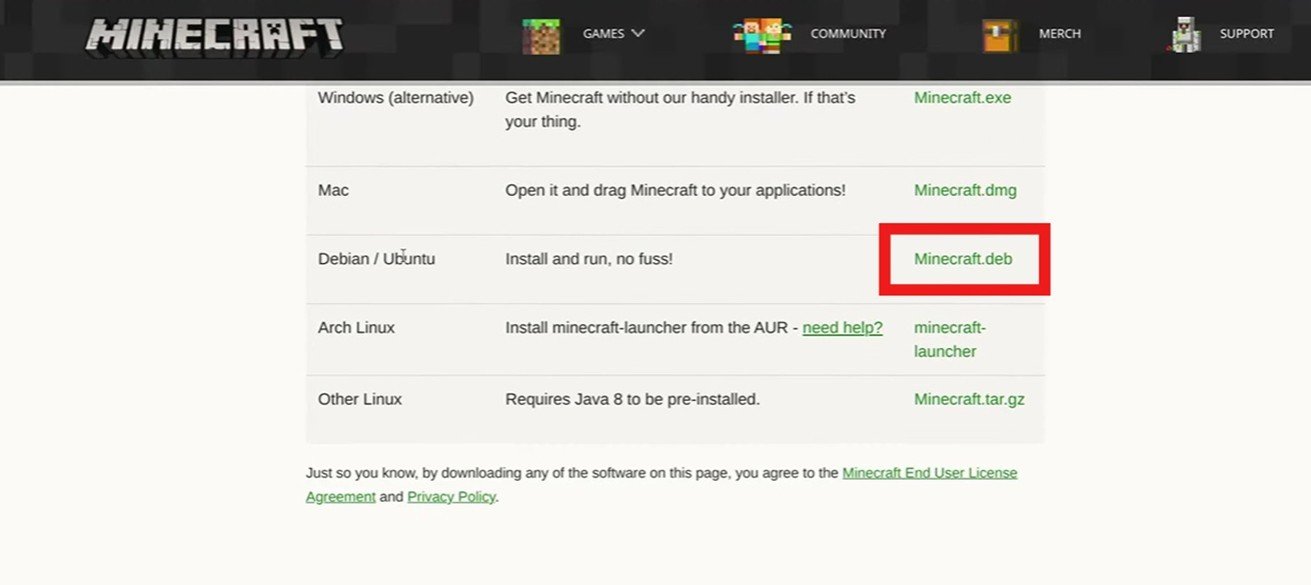 Image: youtube.com
Download the Minecraft.deb file from the official website, which is specifically designed for Debian/Ubuntu-based operating systems. After downloading, move the file to the "Linux files" section, and then use the search bar in the local "Start" menu to find the "terminal" application. Now it's time to feel like a real programmer!
Once the program opens, enter the following command:
This updates the list of available packages and loads fresh data about program versions. This is necessary to ensure that the system uses the most current information when installing or updating programs.
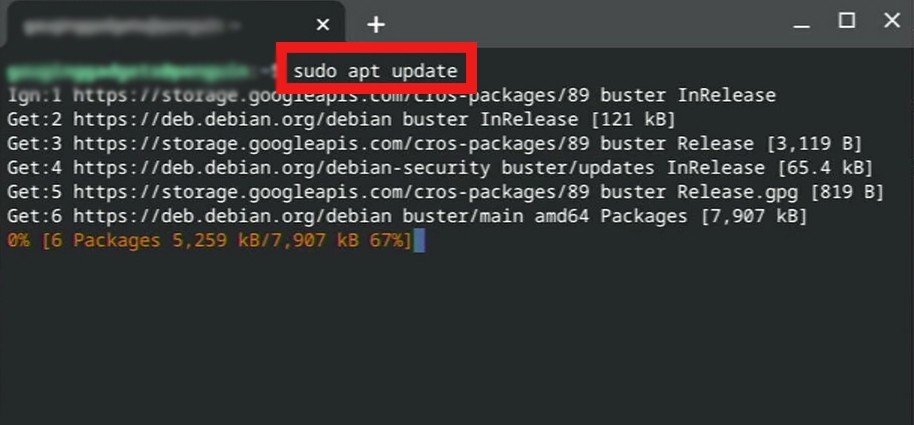 Image: youtube.com
Next, you can begin the installation. In the terminal, enter:
This command runs the dpkg utility (the package manager for Debian-based systems) with administrative rights and installs the specified package, which is Minecraft.deb.
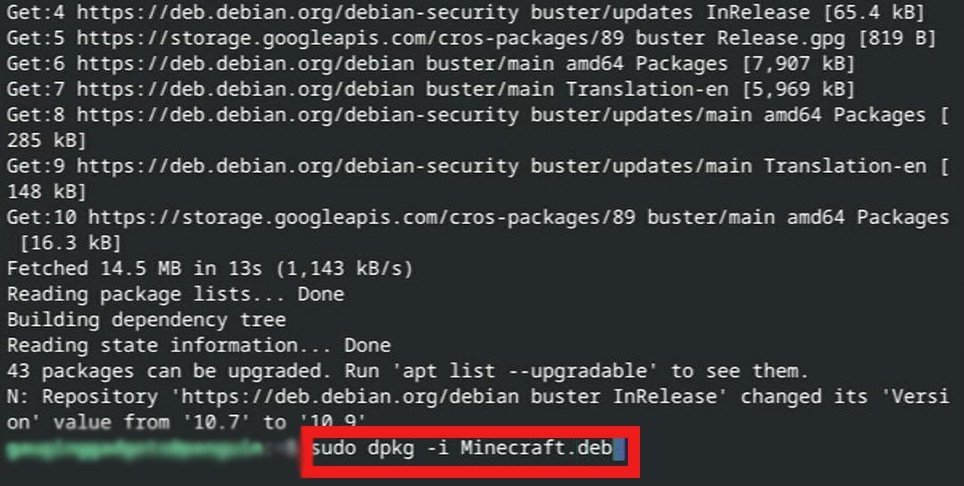 Image: youtube.com
An error related to dependencies may occur, but don’t panic! In Linux, almost everything is possible. Therefore, enter the following:
This command automatically fixes dependency issues. It means "Installation as root with fixing broken dependencies". So, if any errors occurred due to missing libraries, this command will attempt to automatically download and install them.
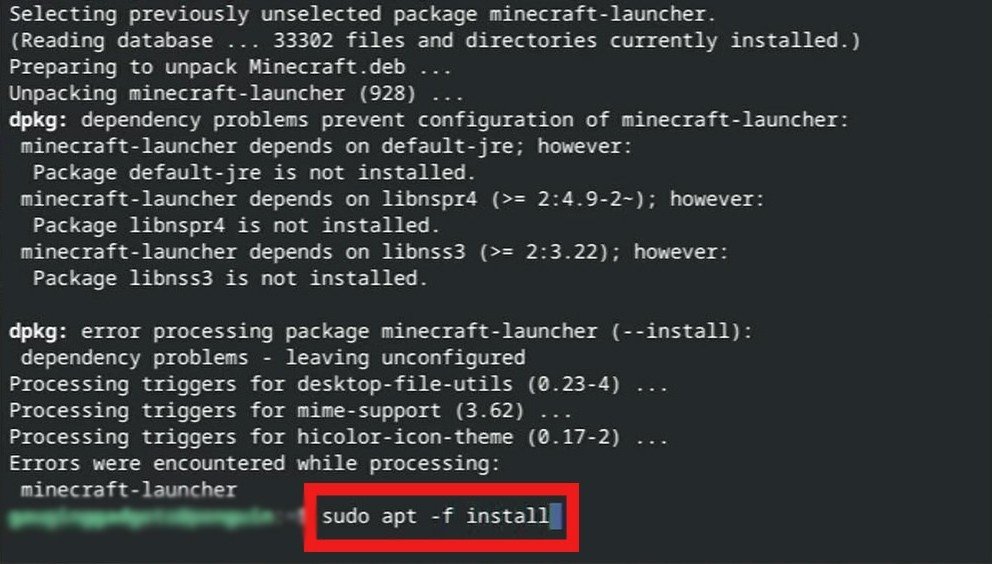 Image: youtube.com
Next, you will see a message: "Do you want to continue? [Y/n]". Type "Y" to confirm and allow the terminal to proceed. The package download and Minecraft installation will begin. Wait for it to finish, then proceed to the next step.
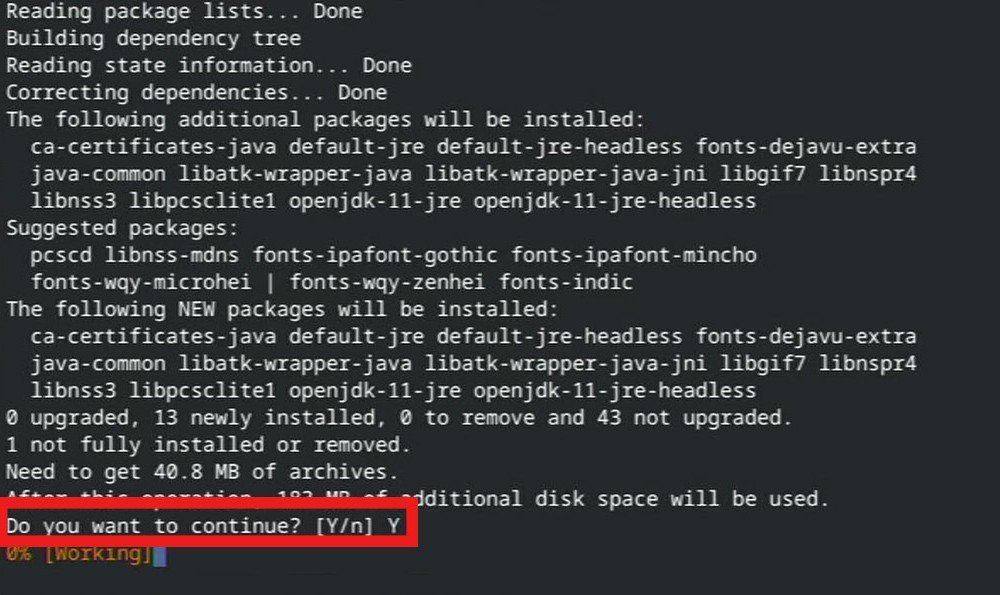 Image: youtube.com
Running the Game
After these steps in the terminal, the Minecraft Launcher should appear in the menu. Open it by double-clicking, just like you would on Windows. It might take a while for the program to update. After that, the next steps will be very familiar to you:
- Log in to your Microsoft account;
- Click Play, wait for the files to load, and enjoy!
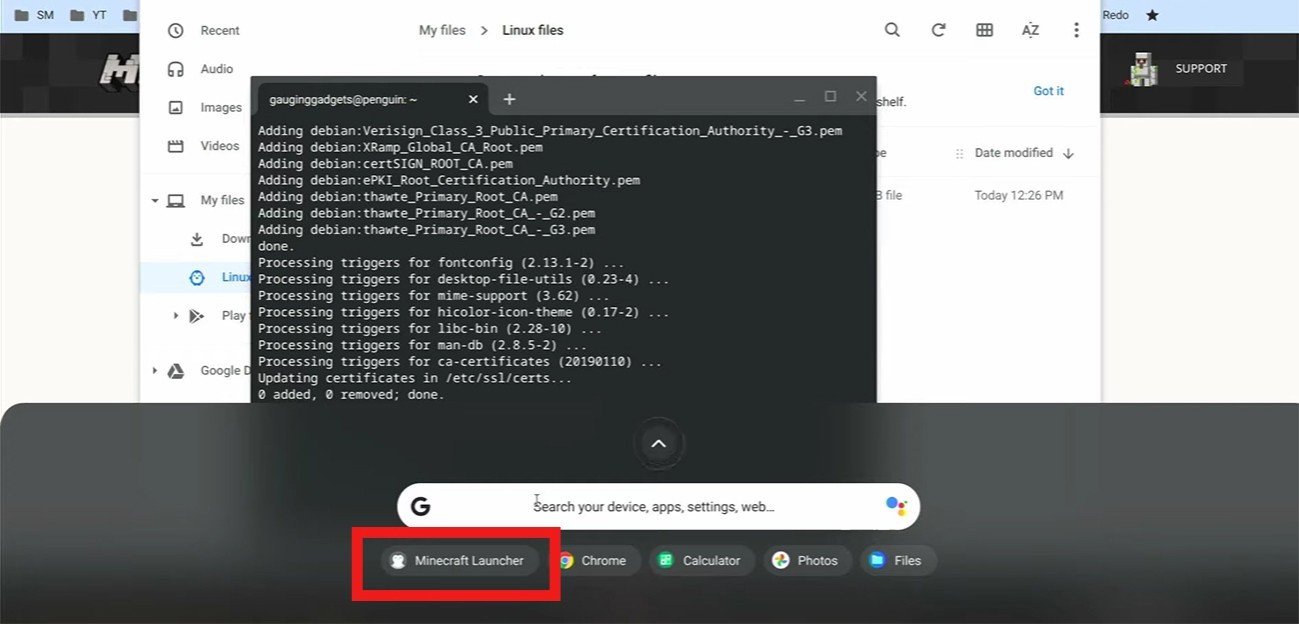 Image: youtube.com
How to Play Minecraft on a Chromebook with Low Specs
This version is almost identical to the ones supported on other OS, but keep an eye on your Chromebook’s specifications: if the RAM is less than 4 GB, the game may lag. Lower the settings to increase FPS. The performance is particularly affected by:
-
Vsync;
-
Biome Blend;
-
Graphics: If there are stutters, set it to “Fast”;
-
Render Distance;
-
Simulation Distance.
To balance image quality and performance, experiment with these settings. If a high framerate is your only priority, set the values as shown in the image.
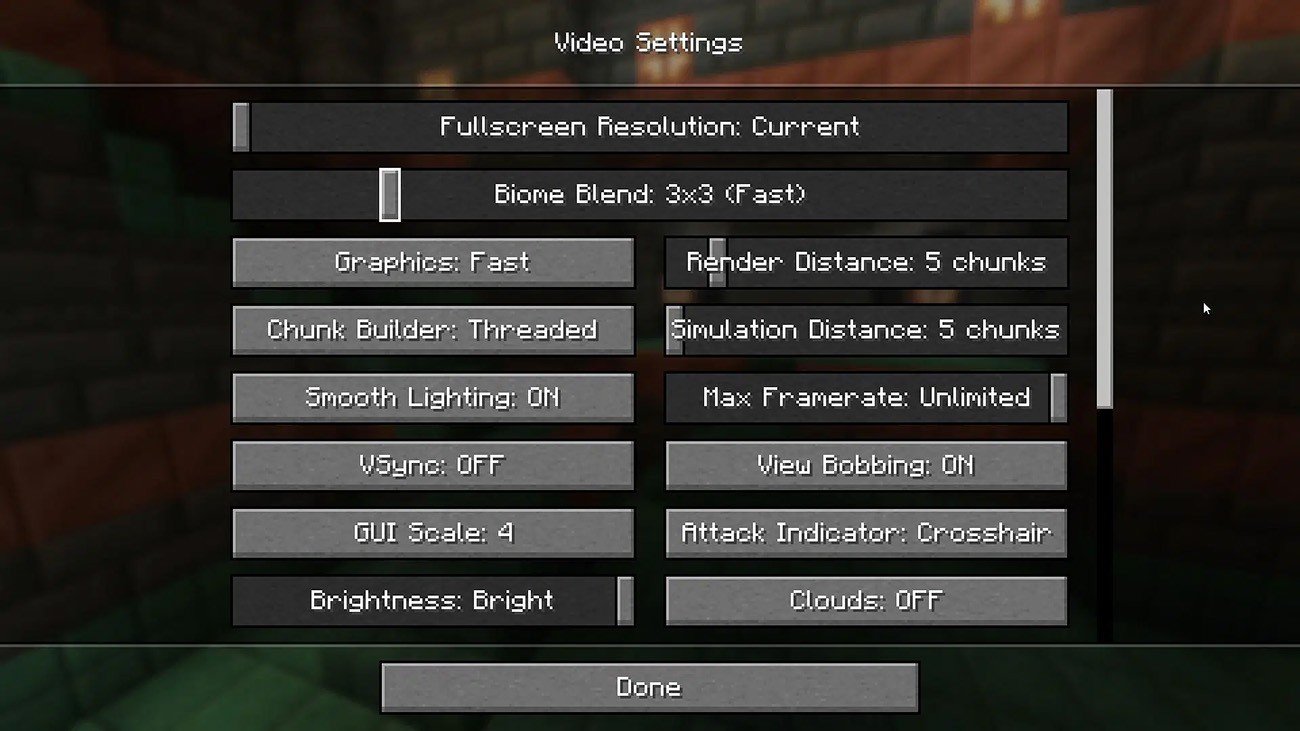 Image: 9minecraft.net
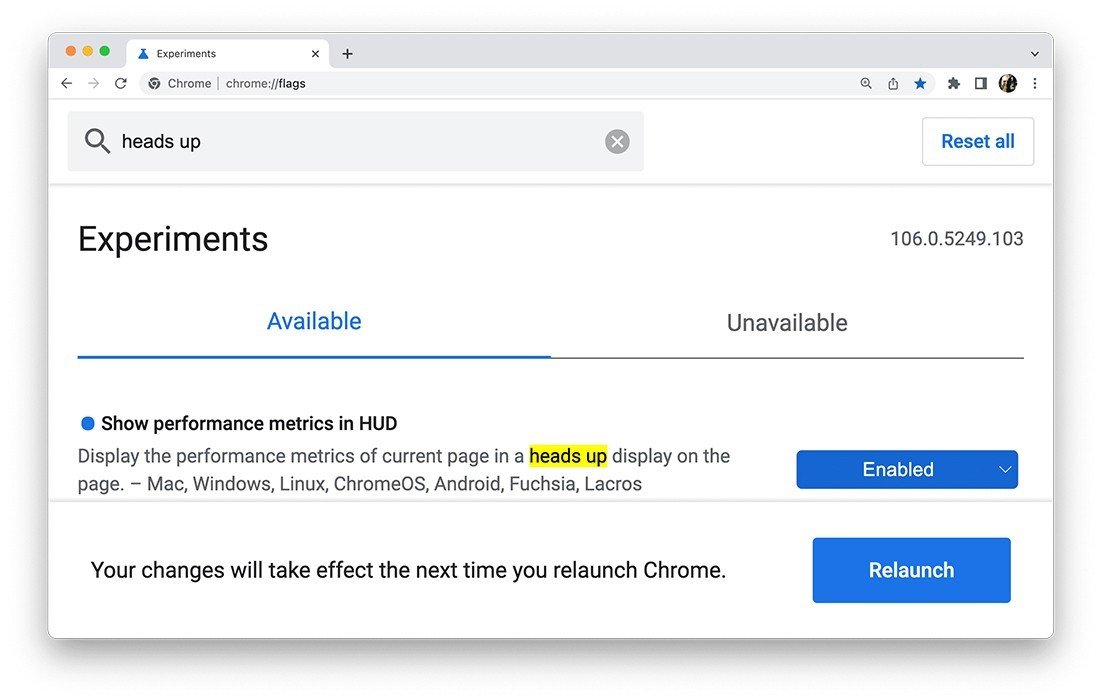
Enhancing Performance on Chrome OS
You can also enable specific flags in Chrome OS to boost performance, which is especially useful for gaming. To do this, open the browser and type in the address bar:
This will take you to a page with various features. Use the search bar to find the necessary flags to enhance performance and enable them by selecting "Enabled". Don’t forget to restart the device for the changes to take effect.
Some useful performance-enhancing settings include "scheduler-configuration", which regulates the task scheduler responsible for distributing processes across threads. Set this option to "Hyper-Threading" for maximum performance gains.
Another useful setting is "ignore-gpu-blocklist", which bypasses the limitation on using GPUs that might have compatibility issues. This can improve performance in games, but there are small risks. If enabling it causes display issues such as screen artifacts or slowdowns, or if your Chromebook begins to drain faster or lag, disable it immediately.
The next useful flag, "enable-gpu-rasterization", speeds up graphics by using the GPU for rendering, instead of the CPU, which is the default. Finally, enabling "override-software-rendering-list" forces hardware acceleration for graphics, even if the system thinks your GPU is not supported. Be cautious with this flag, and if you notice any performance improvements or instability (such as faster battery drain, overheating, or noise), disable it.
Despite some limitations related to performance and control, using the appropriate installation and configuration methods allows you to install your favorite blocky world on such an unconventional device. We hope that after following our guide, you'll finally be able to play Minecraft on Chromebook!
Main image: deskcity.org


0 comments